While I was animating, I was constantly thinking what sounds I could potentially use for each scene. Whether it was the noises Pigham was making, or the sound of the apple hitting his head. The one thing that I was stuggling with was what music should be played in the background.
I am usually terrible with this sort of thing. However, while browsing the Internet one day I came across a video with some amusing music that I thought would be perfect for my animation. The video is called "Socks with Sandals" and features a peice of music called "Merry Go" by Kevin MacLeod.
I thought that the upbeat nature of the music sounded like it would perfectly match my animation. It compliments Pigham's failed attempts at grabbing the apple, and especially fits the closing scene where the apples fall on Pigham's head.
I felt that the music fitting my animation so well that there was no need to include any sound effects at all. The music has an old, black and white TV show sound to it, and I felt that adding any sound effects would ruin the mood.
I am very happy with the music and believe that it truely adds to the animation.
Wednesday, 16 March 2011

Tuesday, 15 March 2011
Shaky Camera
It was suggested by Richard that I made the camera shake when the apples landed on Pigham's head in order to create a better effect.
The first method that I tired was simply moving the target of the camera in the scene every frame and setting it as a keyframe. While this did work, it didnt create the effect that I wanted. The movements were too sudden and jerky.
So I had a look online and found this tutorial:
For this method, I set an assign controller to the position of the camera target. I then set a Noise Position which made the camera target randomly jerk around. Again, the effect wasnt perfect, but luckily, this way I was able to control the strength of the jerkiness. So I made it much smoother and in my opinion, made it perfect.
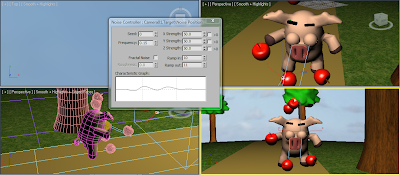
Unfortunately, the one problem that I had with this method was that I was unable to control the exact frames where the camera would move. Im sure that there would be a way to control this, but I just could not find one. So the best solution that I could come up with was to save the shaky camera as a new save file. Then I rendered the few frames in that save file where I wanted the camera to shake, and rendered the rest of the frames normally in the other save file. I then stuck them together in Premiere Pro.
I am quite happy with the shaky camera scene as I feel that it adds to the scene.
The first method that I tired was simply moving the target of the camera in the scene every frame and setting it as a keyframe. While this did work, it didnt create the effect that I wanted. The movements were too sudden and jerky.
So I had a look online and found this tutorial:
For this method, I set an assign controller to the position of the camera target. I then set a Noise Position which made the camera target randomly jerk around. Again, the effect wasnt perfect, but luckily, this way I was able to control the strength of the jerkiness. So I made it much smoother and in my opinion, made it perfect.

Unfortunately, the one problem that I had with this method was that I was unable to control the exact frames where the camera would move. Im sure that there would be a way to control this, but I just could not find one. So the best solution that I could come up with was to save the shaky camera as a new save file. Then I rendered the few frames in that save file where I wanted the camera to shake, and rendered the rest of the frames normally in the other save file. I then stuck them together in Premiere Pro.
I am quite happy with the shaky camera scene as I feel that it adds to the scene.
Friday, 11 March 2011
Rabbit Animation Test
I tested the first scene where the rabbit would be visible on camera. I decided to just have him in the background, minding his own business, and then laughing at Pigham when the apples fall on his head.
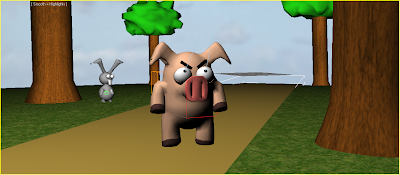
Unfortunately, I am not very happy with the results. I just feel that having another character in the background is too distracting. Especially when he isnt even a main character. I also feel as though I have to put more effort into animating the rabbit than I did for Pigham. In my opinion, its just not worth it. Its a shame that there is a time limit for the animation, because I would have loved to animate the original ending where he steals the apple. However, it probably worked out for the best because I feel that the new ending is far more effective.
I will include the unused animated scene with the rabbit on the disk submitted with the report.

Unfortunately, I am not very happy with the results. I just feel that having another character in the background is too distracting. Especially when he isnt even a main character. I also feel as though I have to put more effort into animating the rabbit than I did for Pigham. In my opinion, its just not worth it. Its a shame that there is a time limit for the animation, because I would have loved to animate the original ending where he steals the apple. However, it probably worked out for the best because I feel that the new ending is far more effective.
I will include the unused animated scene with the rabbit on the disk submitted with the report.
Rabbit Bone Rigging
As I have finished my animation quite early and have plenty of time left, I have decided to have a go at rigging my rabbit character so that I may be able to slip him in the animation somewhere.
I tried to use the standard biped at first, but soon realised that this would just not be possible due to the position of the rabbit's limbs. So I had to use the Bone feature to create my own biped. I had never used this feature before, so it was an interesting experiment.
It wasnt as hard as I was expecting it to be. All I had to do was create 1 bone at a time, simply by clicking the length that I wanted it to be.

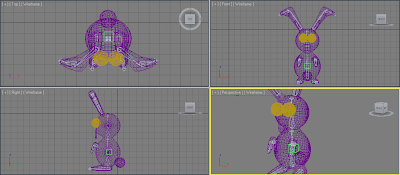
I probably didnt bone it in the best possible way, but it was enough to get the basic movements that I wanted. The rabbit would also be in the background, so his movements dont have to be perfectly smooth.
I was expecting to have to create a biped model almost as complex as the standard biped, but all that I had to do was create 1 or 2 bones in the main areas, such as the arms and feet, and then link them to a dummy in the middle of the model. That way, I could move the dummy and it would drag the bones with it.
Im quite happy with the way that it turned out. However, I much prefer using the standard biped, as it is so much easier to animate.
I tried to use the standard biped at first, but soon realised that this would just not be possible due to the position of the rabbit's limbs. So I had to use the Bone feature to create my own biped. I had never used this feature before, so it was an interesting experiment.
It wasnt as hard as I was expecting it to be. All I had to do was create 1 bone at a time, simply by clicking the length that I wanted it to be.


I probably didnt bone it in the best possible way, but it was enough to get the basic movements that I wanted. The rabbit would also be in the background, so his movements dont have to be perfectly smooth.
I was expecting to have to create a biped model almost as complex as the standard biped, but all that I had to do was create 1 or 2 bones in the main areas, such as the arms and feet, and then link them to a dummy in the middle of the model. That way, I could move the dummy and it would drag the bones with it.
Im quite happy with the way that it turned out. However, I much prefer using the standard biped, as it is so much easier to animate.
Friday, 18 February 2011
Skydome
When it comes to creating a background for my animations in 3D Studio Max, I usually take the easy option and simply apply a background image to a plane and stick it far enough away to give it some distance. This is usually good enough and does the job. Even more so when the camera remains still for most of the animation (Like how I originally planned mine to be). However, with the camera angles constantly changing it becomes increasingly obvious that the background is more or less a giant poster and ruins the illusion. This is where skydomes, or sky boxes, come in.
I have never used a skydome before, but I am well aware of how effective they can be. Essentially, a sky done is just a sphere with a background image attached to the inside. The sphere is then placed around the scene, creating a more believable environment. This way the camera can freely move around without effecting the angle of the background.
While it is certainly more usful from an animation point of view, I have to say that I still prefer just using a plane. Probably because it is so much simpler. Here is a comparison between my old plane background and the new skydome background:


In my opinion, the plane background looks so much better because the image has not been stretched. While it is possible to reduce the amount of stretch on an image in a skydome, I just found it very difficult to get it to look as perfect as it did beforehand. It also didnt help that I had to find a panorama image for the skydome(an image that can be perfectly placed back to back with no obvious seams), which was quite difficult to do.
Here is the tutorial that I used:
Its still quite early into the semester. Im sure that I will have time to fix the stretching, or even find a better image. Still, I am happy enough with the way it has turned out. It, along with the new camera angles, definately improves the atmosphere in my animation.
I have never used a skydome before, but I am well aware of how effective they can be. Essentially, a sky done is just a sphere with a background image attached to the inside. The sphere is then placed around the scene, creating a more believable environment. This way the camera can freely move around without effecting the angle of the background.
While it is certainly more usful from an animation point of view, I have to say that I still prefer just using a plane. Probably because it is so much simpler. Here is a comparison between my old plane background and the new skydome background:


In my opinion, the plane background looks so much better because the image has not been stretched. While it is possible to reduce the amount of stretch on an image in a skydome, I just found it very difficult to get it to look as perfect as it did beforehand. It also didnt help that I had to find a panorama image for the skydome(an image that can be perfectly placed back to back with no obvious seams), which was quite difficult to do.
Here is the tutorial that I used:
Its still quite early into the semester. Im sure that I will have time to fix the stretching, or even find a better image. Still, I am happy enough with the way it has turned out. It, along with the new camera angles, definately improves the atmosphere in my animation.
Tutorial Work - Lip Syncing
While this tutorial is certainly useful, I felt that I did not need to complete it for 2 reasons. 1 being that I had already learnt how to use the morpher tool in order to form facial expressions last year, albeit for a much simpler model. The second reason being that Pigham doesn’t actually have a mouth! However I have still had a (unfinished) go at it, just to jog my memory and to show that I have at least attempted it. I am sure that this will be useful for future animations.
Thursday, 17 February 2011
Body Movement Videos
As part of our research, we were asked to find a few videos demonstrating body movements. I used 2 of my own videos that I had taken on my phone and found one on the internet, just for a little variation.
Dancing
This video is of my friends playing Beer Pong. In the background is another friend who is dancing. I just like the way he moves his body and arms, and think that it would be quite amusing to have a character dancing in a similar manner. It shows elements of happiness and excitement. Regrettably, I don’t think that using these movements would be of much use for my animation. At least, not if it is meant to be only 1 minute. If I had no time limit, I may have been able to make Pigham do it as a little victory dance when he picks up the apple. However, I have already gone over the time limit, so unfortunately I will have to leave it out.
Helium
This video is of a friend who, as the title may suggest, has inhaled helium. While this video does not necessarily have much body movement, it does have a variety of facial expressions. It shows how when someone is happy their movements become more upbeat.
Angry Walk
This video is of a woman walking angrily. While her expression does give away that she may be feeling angry, we can tell from the body movements alone what she is feeling. We can tell that she is angry by the way that she leans forward and stiffens her arm and leg movements into a march-like motion. At one point in my animation, Pigham angrliy walks off-screen and I have done exactly what the woman in the video does. Pigham leans forward, rises his arms and marches off.
Dancing
This video is of my friends playing Beer Pong. In the background is another friend who is dancing. I just like the way he moves his body and arms, and think that it would be quite amusing to have a character dancing in a similar manner. It shows elements of happiness and excitement. Regrettably, I don’t think that using these movements would be of much use for my animation. At least, not if it is meant to be only 1 minute. If I had no time limit, I may have been able to make Pigham do it as a little victory dance when he picks up the apple. However, I have already gone over the time limit, so unfortunately I will have to leave it out.
Helium
This video is of a friend who, as the title may suggest, has inhaled helium. While this video does not necessarily have much body movement, it does have a variety of facial expressions. It shows how when someone is happy their movements become more upbeat.
Angry Walk
This video is of a woman walking angrily. While her expression does give away that she may be feeling angry, we can tell from the body movements alone what she is feeling. We can tell that she is angry by the way that she leans forward and stiffens her arm and leg movements into a march-like motion. At one point in my animation, Pigham angrliy walks off-screen and I have done exactly what the woman in the video does. Pigham leans forward, rises his arms and marches off.
Subscribe to:
Posts (Atom)